
[카카오로그인] REST API 카카오 로그인 구현 2(코드,토큰 받기)
2021.10.10 - [Project [study]/Social Login] - [카카오로그인] REST API 카카오 로그인 구현 1
[카카오로그인] REST API 카카오 로그인 구현 1
카카오 로그인 기능 적용해보기. 카카오 개발 가이드를 토대로 기능을 작성해본다. Kakao Developers https://developers.kakao.com/docs/latest/ko/kakaologin/prerequisite Kakao Developers 카카오 API를 활용..
nxxrxx.tistory.com
이제 세팅하고 구현해보자
kakao developers에서 이부분 참고하기
https://developers.kakao.com/docs/latest/ko/kakaologin/rest-api#req-user-info
Kakao Developers
카카오 API를 활용하여 다양한 어플리케이션을 개발해보세요. 카카오 로그인, 메시지 보내기, 친구 API, 인공지능 API 등을 제공합니다.
developers.kakao.com
pom.xml
<!-- 자바객체를 gson으로 -->
      <!-- https://mvnrepository.com/artifact/com.google.code.gson/gson -->
        <dependency>
         <groupId>com.google.code.gson</groupId>
         <artifactId>gson</artifactId>
         <version>2.8.2</version>
      </dependency>
1) 코드 받기
카카오톡 로그인 기능은 일반적인 OAuth 인증의 과정을 거친다.
우선 로그인 버튼 클릭 시 코드를 받아와서 사용자 토큰을 얻을 준비를 한다.
[Request]
GET /oauth/authorize?client_id={REST_API_KEY}&redirect_uri={REDIRECT_URI}&response_type=code HTTP/1.1
Host: kauth.kakao.com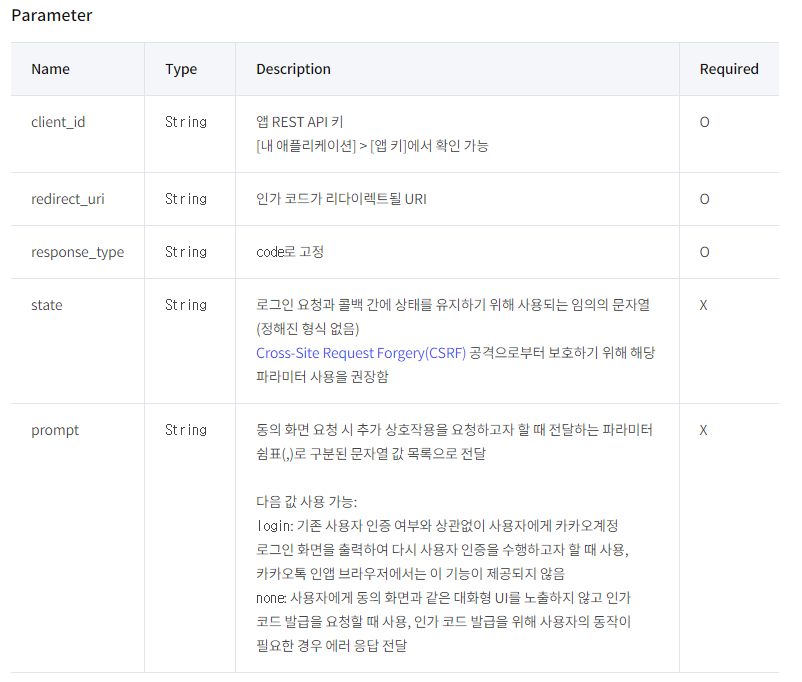
그럼 Request URL은
https://kauth.kakao.com/oauth/authorize?client_id={REST_API_KEY}&redirect_uri={REDIRECT_URI}&response_type=code
이다.
{REST_API_KEY}, {REDIRECT_URI}를 넣고 주소를 쳐보면 카카오 로그인 창이 뜬다. 각자 아이디로 카카오 로그인을 하게 되면 에러창이 뜨지만 URL을 보면 code= 하고 주소 뒤에 코드가 나올 것이다.
2) 토큰받기
[토큰 받기]
POST /oauth/token HTTP/1.1
Host: kauth.kakao.com
Content-type: application/x-www-form-urlencoded;charset=utf-8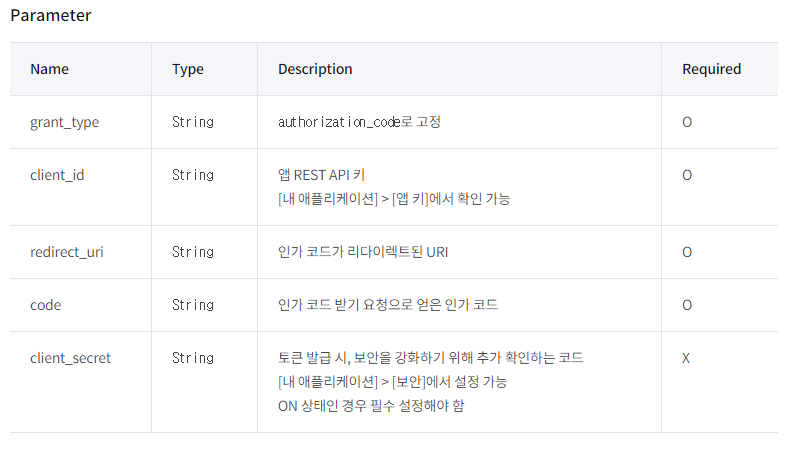
이제 카카오 로그인과 프로필을 받아와 보자!
kakao developers의 토큰받기의 Response:성공부분의
{
"token_type":"bearer",
"access_token":"{ACCESS_TOKEN}",
"expires_in":43199,
"refresh_token":"{REFRESH_TOKEN}",
"refresh_token_expires_in":25184000,
"scope":"account_email profile"
}
이 json부분을 자바 객체로 만들어준다.
http://www.jsonschema2pojo.org/
jsonschema2pojo
Reference properties For each property present in the 'properties' definition, we add a property to a given Java class according to the JavaBeans spec. A private field is added to the parent class, along with accompanying accessor methods (getter and sette
www.jsonschema2pojo.org
에 들어가서 저 윗부분을 붙여넣고
프리뷰를 클릭하면
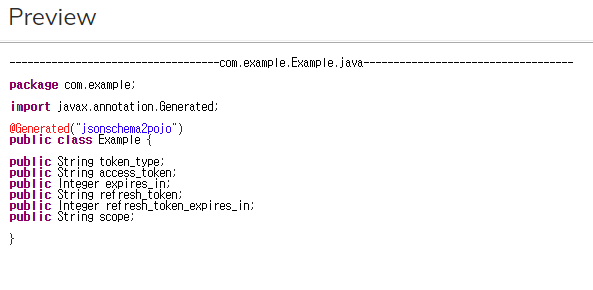
이걸 복사해서 KakaoAuth.java를 만든다. (안의 내용만 복사하고 알맞은 어노테이션을 붙여주면 된다.)
KakaoAuth.java
package edu.bit.ex.vo;

import lombok.AllArgsConstructor;
import lombok.Getter;
import lombok.NoArgsConstructor;
import lombok.Setter;
import lombok.ToString;

@Getter
@Setter
@AllArgsConstructor
@NoArgsConstructor
@ToString
public class KakaoAuth {
    public String token_type;
    public String access_token;
    public Integer expires_in;
    public String refresh_token;
    public Integer refresh_token_expires_in;
    public String scope;
}
KakaoService.java
package edu.bit.ex.service;

import org.springframework.http.HttpEntity;
import org.springframework.http.HttpHeaders;
import org.springframework.http.HttpStatus;
import org.springframework.http.ResponseEntity;
import org.springframework.stereotype.Service;
import org.springframework.util.LinkedMultiValueMap;
import org.springframework.util.MultiValueMap;
import org.springframework.web.client.RestTemplate;

import com.google.gson.Gson;

import edu.bit.ex.vo.KakaoAuth;
import edu.bit.ex.vo.KakaoProfile;


//request URL
//https://kauth.kakao.com/oauth/authorize?client_id={REST_API_KEY}&redirect_uri={REDIRECT_URI}&response_type=code HTTP/1.1

@Service
public class KakaoService {

    //rest api키
    private final static String K_CLIENT_ID="rest api 코드기입";
    private final static String K_REDIRECT_URI="http://localhost:8282/ex/auth/kakao/callback";

    // requst 요청
    //GET /oauth/authorize?client_id={REST_API_KEY}&redirect_uri={REDIRECT_URI}&response_type=code HTTP/1.1
    //Host: kauth.kakao.com

    public String getAuthoriationUrl() {
        String kakaoUrl = "https://kauth.kakao.com/oauth/authorize?" + "client_id=" + K_CLIENT_ID + "&redirect_uri="
                   + K_REDIRECT_URI + "&response_type=code";
       return kakaoUrl;
    }


  //토큰받기
    //"https://kauth.kakao.com/oauth/token"
    /*
       POST /oauth/token HTTP/1.1
       Host: kauth.kakao.com
       Content-type: application/x-www-form-urlencoded;charset=utf-8
     */

    //request
    /*
    curl -v -X POST "https://kauth.kakao.com/oauth/token" \
    -H "Content-Type: application/x-www-form-urlencoded" \
    -d "grant_type=authorization_code" \
    -d "client_id={REST_API_KEY}" \
    --data-urlencode "redirect_uri={REDIRECT_URI}" \
    -d "code={AUTHORIZE_CODE}"
    */

    //response:성공
    /*
     HTTP/1.1 200 OK
    Content-Type: application/json;charset=UTF-8
    {
        "token_type":"bearer",
        "access_token":"{ACCESS_TOKEN}",
        "expires_in":43199,
        "refresh_token":"{REFRESH_TOKEN}",
        "refresh_token_expires_in":25184000,
        "scope":"account_email profile"
    }
     */
    private final static String K_TOKEN_URI = "https://kauth.kakao.com/oauth/token";

    public KakaoAuth getKakaoTokenInfo(String code) {

        // http 요청을 간단하게 해줄 수 있는 클래스
        RestTemplate restTemplate = new RestTemplate();

        //헤더구성 클래스(Set Header)
        HttpHeaders headers = new HttpHeaders();
        headers.add("Content-type", "application/x-www-form-urlencoded;charset=utf-8");

        //파라미터 넘기기(Set Parameter)
        MultiValueMap<String, String> params = new LinkedMultiValueMap<>();
        params.add("grant_type", "authorization_code");
        params.add("client_id", K_CLIENT_ID);
        params.add("redirect_uri", K_REDIRECT_URI);
        params.add("code", code);

        //set http entity
        HttpEntity<MultiValueMap<String, String>> kakaoTokenRequest = new HttpEntity<>(params, headers);

        //실제 요청하기
        //Http 요청하기 - POST 방식으로 - 그리고 response 변수의 응답을 받음.
        ResponseEntity<String> response = restTemplate.postForEntity(K_TOKEN_URI, kakaoTokenRequest, String.class);

        System.out.println("getBody() : " + response.getBody());
        System.out.println("getHeaders() : " + response.getHeaders());

        //http://www.jsonschema2pojo.org/
        //json->자바코드로

        //Gson, Json Simple, ObjectMapper 세가지 정도의 클래스가 있음
        Gson gson = new Gson();
        if (response.getStatusCode() == HttpStatus.OK) {

            return gson.fromJson(response.getBody(), KakaoAuth.class);
        }

        return null;
    }


}
SocialController.java
package edu.bit.ex;
import org.springframework.beans.factory.annotation.Autowired;
import org.springframework.stereotype.Controller;
import org.springframework.ui.Model;
import org.springframework.web.bind.annotation.GetMapping;
import edu.bit.ex.service.KakaoService;
import edu.bit.ex.vo.KakaoAuth;
import edu.bit.ex.vo.KakaoProfile;
import lombok.extern.log4j.Log4j;
//토큰 요청
/*
* POST /oauth/token HTTP/1.1 Host: kauth.kakao.com Content-type:
* application/x-www-form-urlencoded;charset=utf-8
*/
@Log4j
@Controller
public class SocialController {
@Autowired
private KakaoService kakaoService;
@GetMapping("/social")
public String social(Model model) {
log.info("social()..");
model.addAttribute("kakaoUrl", kakaoService.getAuthoriationUrl());
return"social/login";
}
@GetMapping("/auth/kakao/callback")
public String social1(String code, Model model) {
//1.인증코드 받기
System.out.println("code : " + code);
//2.인증코드 받아서 넘기기
KakaoAuth kakaoAuth = kakaoService.getKakaoTokenInfo(code);
return "social/social_home";
}
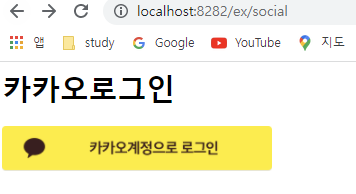
}로그인 창과 나중에 할 프로필을 받아오기 위한 로그인 후 창을 만들어준다.
login.jsp
<%@ page language="java" contentType="text/html; charset=UTF-8" pageEncoding="UTF-8"%>
<html>
<head>
	<title>Home</title>
</head>
<body>
<h1>
	카카오로그인
</h1>

<a href="${kakaoUrl}">
	<img src="//mud-kage.kakao.com/14/dn/btqbjxsO6vP/KPiGpdnsubSq3a0PHEGUK1/o.jpg" width="300"/>
</a>
</body>
</html>
social_home.jsp
<%@ page language="java" contentType="text/html; charset=UTF-8"
pageEncoding="UTF-8"%>
<html>
<head>
	<title>Home</title>
</head>
<body>
<h1>
	카카오 프로파일
</h1>

<P>  ${user.kakao_account.profile.nickname} 님, 환영합니다. </P>
<img alt="그림없음" src="${user.kakao_account.profile.profile_image_url}">
</body>
</html>
결과
카카오계정으로 로그인을 클릭하면 이클립스 콘솔창에서 토큰을 확인할 수 있다.

'BackEnd > Social Login' 카테고리의 다른 글
| [카카오로그인] REST API 카카오 로그인 구현 3 (로그인, 프로필 받아오기) (0) | 2021.10.12 |
|---|---|
| [카카오로그인] REST API 카카오 로그인 구현 1 (0) | 2021.10.10 |